11
Networking Commands Every Windows Admin Should Know
Ping
I am guessing that the ping command is
probably the most familiar, and most widely used of the utilities being
discussed in this article, but that does not make it any less essential.
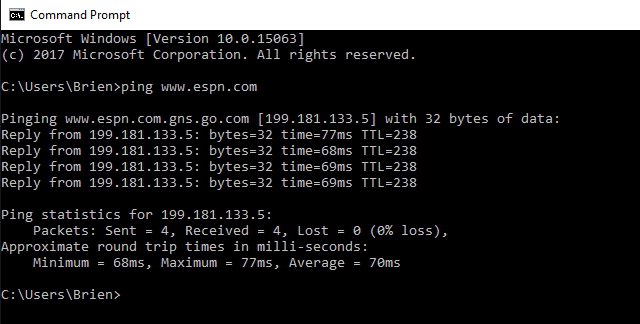
Ping is used to test the ability of one
network host to communicate with another. Simply enter the Ping command,
followed by the name or the IP address of the destination host. Assuming that
there are no network problems or firewalls preventing the ping from completing,
the remote host will respond to the ping with four packets. Receiving these
packets confirms that a valid and functional network path exists between the
two hosts.
NetStat
If you are experiencing problems with
network communications, then network statistics can sometimes help point you
toward the root cause of the problem. That’s where the aptly named NetStat command comes into play. This command has a number
of different functions, but the most useful of these is to display network
summary information for the device. To see this type of
summary information, just type NetStat -e.
ARP
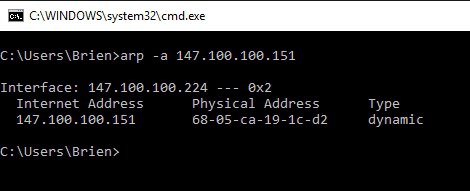
The ARP command corresponds to the Address Resolution Protocol. Although it is easy
to think of network communications in terms of IP addressing, packet delivery
is ultimately dependent on the Media Access Control (MAC) address of the
device’s network adapter. This is where the Address Resolution Protocol comes
into play. Its job is to map IP addresses to MAC addresses. Windows devices
maintain an ARP cache, which contains the results of recent ARP queries. You
can see the contents of this cache by using the ARP -A command. If you are
having problems communicating with one specific host, you can append the remote
host’s IP address to the ARP -A command.
NbtStat
NbtStat -R
(Reload) Purges and
reloads the remote cache name table
NbtStat /h
As I am sure you probably know, computers that are running a Windows operating system are
assigned a computer name. Oftentimes, there is a domain name or a workgroup
name that is also assigned to the computer. The computer name is sometimes
referred to as the NetBIOS name. Windows uses several different methods to map
NetBIOS names to IP addresses, such as broadcast, LMHost
lookup, or even using the nearly extinct method of querying a WINS server. Of
course, NetBIOS over TCP/IP can occasionally break down. The NbtStat command can help you to diagnose and correct such
problems. The NbtStat -n command for example, shows
the NetBIOS names that are in use by a device. The NbtStat -r command shows how many NetBIOS names
the device has been able to resolve recently.
Hostname
The previously discussed NbtStat command can provide you with the host name that has
been assigned to a Windows device, if you know which switch to use with the
command. However, if you’re just looking for a fast and easy way of verifying a
computer’s name, then try using the Hostname command.
Typing Hostname at the command prompt returns the local computer name.
Tracert
Contrary to what a rather infamous
YouTube video might lead you to believe, Tracert
isn’t pronounced “Tracer T,” nor can it show you how many people are using
Google right this second. Instead, Tracert, or “Trace
Route,” is a utility for examining the path to a remote host. Functionally, Tracert works similarly to Ping. The major difference is
that Tracert sends a series of ICMP echo requests,
and the request’s TTL increased by 1 each time. This allows the utility to
display the routers through which packets are passing to be identified. When
possible, Windows displays the duration and IP address or fully qualified
domain name of each hop.
One utility that I find
myself using constantly is IPConfig.
At its simplest, the IPConfig command will display
basic IP address configuration information for the device. Simply type IPConfig at the Windows command prompt,
and you will be presented with the IP address, subnet mask, and default gateway
that the device is currently using.
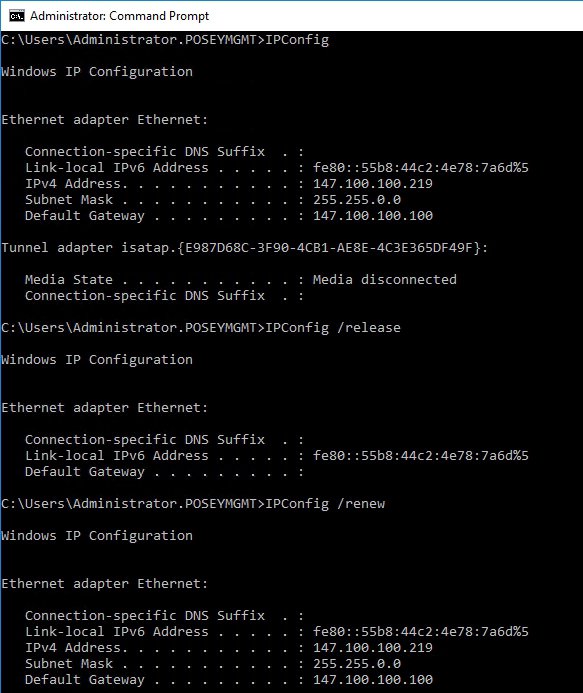
If you would like to see more
detailed information, then type IPConfig /all. Doing
so causes Windows to display IP address configuration that is much more
verbose. This is also the command that you will have to use if you want to see
which DNS server the Windows device is configured to use. The IPConfig command can do much more than just display IP
address configuration information. It also contains options that can help you
to troubleshoot problems related to DNS and DHCP. For example, entering the IPConfig /FlushDNS command purges
the contents of the computer’s DNS resolver cache.
NSLookup
NSLookup is a great utility for diagnosing DNS
name resolution problems. Just type the NSLookup
command, and Windows will display the name and IP address of the device’s
default DNS server. From there, you can type host names in an effort to see if
the DNS server is able to resolve the specified host name.
Route
IP networks use routing
tables to direct packets from one subnet to another. The Windows Route utility
allows you to view the device’s routing tables. To do so, simply type Route
Print. The cool thing about the Route command is that it not only shows you the
routing table, it lets you make changes. Commands such as Route Add, Route
Delete, and Route Change allow you to make routing table modifications on an as
needed basis. The changes that you make can be persistent or nonpersistent, depending on whether you use the -P switch.
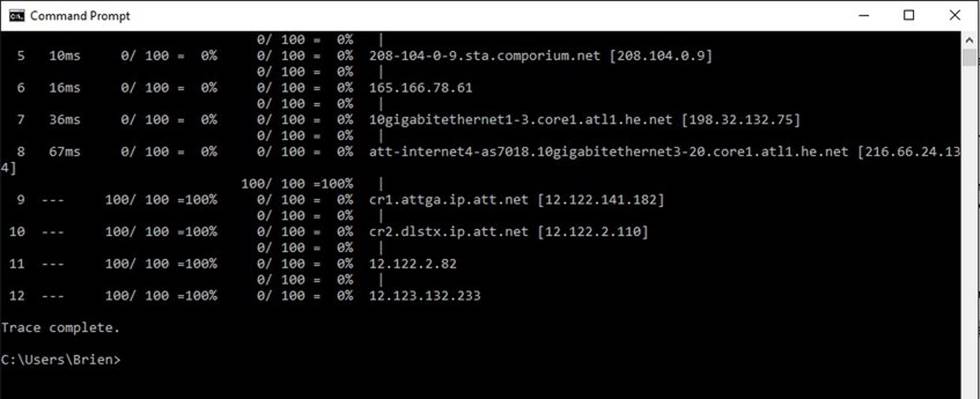
PathPing
Earlier, I talked about the
Ping utility and the Tracert utility, and the
similarities between them. As you might have guessed, the PathPing
tool is a utility that combines the best aspects of Tracert
and Ping. Entering the PathPing command followed by a
host name initiates what looks like a somewhat standard Tracert
process. Once this process completes however, the tool takes 300 seconds (five
minutes) to gather statistics, and then reports latency and packet loss
statistics that are more detailed than those provided by Ping or Tracert.
NetDiag
Perhaps the most useful of
the network utilities that are built into Windows is NetDiag.
The NetDiag command is designed to run a battery of
tests on the computer in order to help the technician figure out why the
computer is experiencing networking problems. One of the things that I really
like about this tool is that although there are a number of optional switches
that you can use, you don’t have to use any of them unless you want to.
Entering the NetDiag command by itself will cause all
of the available tests to be run. In some cases, NetDiag
can not only identify problems, but can also fix those problems. Obviously, NetDiag cannot automatically correct every problem that it
finds, but appending the /Fix parameter to the command will tell NetDiag to attempt to fix the problem automatically. The
Windows operating system is jam packed with command line utilities. Many of
these utilities are left over from operating systems that were introduced
decades ago. Even so, the utilities that I have discussed in this article are
every bit as useful today as they were when they were first introduced.